Overview
The third lecture in the Web Systems Development module focused on adding more JavaScript knowledge to that of the previous week. The lecture focused mainly on understanding the DOM (Document Object Model) and how to access the HTML elements. This was followed by multiple examples, namely the Running Man animation.
Through the lecture and accompanied by further reading, I was able to understand some of the commonly used DOM properties and methods and how they are used. Such as getting an HTML element with the specified id using "getElementByID()".
I did some furthur reading on Cookies, JQuery and String manipulation for better understanding. NewThinkTank has a slew of very useful video tutorial, which I used. http://www.newthinktank.com/
Weekly Exercise
This week, we were asked to implement the Running Man animation, and add functionality to slow down/ speed up the animation as well as be able to "throw" an obstacle at the runner. The core script of the basic running loop was featured on the slides.
First off, I decided to draw my own running man images, which I then implemented in the existing code. The code took some tweaking to get to work, mainly getting rid of stray double quotes and some missing semi-colons. Havin checked that the animation was running smoothly so far, I decided to implement the animation-speed manipulation to the page.
For the animation-speed, I first added two buttons, "Faster" and "Slower". Then, I added a variable that will hold the current timing as desired by the user. The provided code makes of the "setInterval()" method when definening the waiting-time for displaying the next image. Adding and subtracting the timing value straight to the "setInterval" method was not working. After some research, I learned that another timing method existed, the "setTimeout" method which can be implemented in the JavaScript, and one will simply change the timing value from the HTML, as shown in the images below:
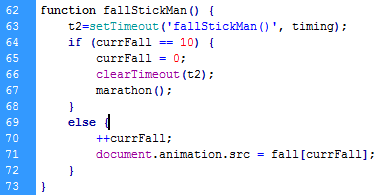
For the "throwning an object" section I decided to change the animation when a button is clicked. I first drew a series of images showing the stick-man falling into a hole and resurrecting. Then I implemented them into my JavaScript and added a second function which will display the "falling" series of images and continue the "running" images afterwards. I decided to add a seperate timer to this function and also made sure to clear both timers when the "Stop" button is pressed. The added function is shown below:
The user is now able to change the animation at the click of a button. I also added some CSS Styling to the whole page and the buttons as a visual enhancement and tested the page on Google Chrome, IE8 and Firefox.


No comments:
Post a Comment