Friday, April 1, 2011

The Server-Side - XAMPP

Introduction

For this week, client-side scripting took the back-seat to make way for server-side scripting. But first, before diving head-on into PHP, an introduction to server-side thinking was due.

One important step was understanding the Dynamic Web Model. This model defines how typical webpage is handled. In basic terms:

  • A user makes a request
  • Server-side language running on server (ex. Perl) recieves it
  • Adjusts reply according to the user input
  • Sends it back in HTML format

This was followed by a look at web-servers and our choice of tools for learning purposes, namely XAMPP.


The Task - XAMPP Configuration

An overview of the task is shown below:

  • Install XAMPP on your computer
  • Test the following functions
    1. Control panel
    2. Check that the http and https services work
    3. Ftp service
    4. Get an XAMPP security report
    5. Get a phpinfo report
    6. Get a visitor report
    7. Test the default guestbook
  • Add an image and a style sheet to C:\xampp\htdocs\index.html and test it out
  • Test your web server from another computer
  • Attempt to replace index.html and other files using an FTP client on another computer

Before continueing with the configuration, the diagram below is intended to illustrate my environment for this configuration

The first step was to download and install XAMPP. I decided to install all it's services; namely, Apache, MySQL and FileZilla on all the environments. When running the setup, on the Windows 7 environment a warning popped up regarding some features not being available and checking your User Account Control. This was solved by probing in the Windows settings right after the installation to turn the required services on and make firewall exceptions for them.

On the Windows 7 environment, I had a previous installation of MySQL, with it's services running which resulted in an "error in port 3306 MySQL connection". Simply stopping and restarting the respective services solved the issue.

The image below shows the installation of XAMPP on the Windows 7 environment

The image below shows the XAMPP control panel running in the Windows 7 environment. Notice that MySQL had been stopped as I was still trying to resolve the conflicting issues between it and XAMPP


The Windows XP installation provided no issues since it was run on a clean Virtual Machine installation.

Turning to the Ubuntu installation, the image below illustrates the intallation of XAMPP

The following image demonstrates the starting of XAMPP server in Ubuntu

The next image checks that XAMPP is runing properly in Ubuntu

Moving through the Control Panel, I now checked what seperate services were running. Using "localhost", you are able to refer to the same machine and the status-running window is displayed in the browser. Through the controls, the next image shows the status of the HTTPS and FTP services (running) in the Windows XP environment.

Next, I took a look at the security report. The Windows 7 XAMPP security report is shown below:

One can also view the PHP info running on the server, as shown in the image below:


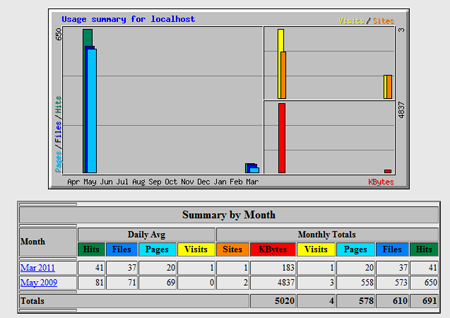
XAMPP also provides a simple visitor report, which is shown below:

A guestbook is also provided, as demonstrated below:

To further check the runnings of the server I put the runningMan animation, which is a previous assignment, into the htdocs folder of the Windows XP environment XAMPP setup. I checked if it was running through all machines on the network by refering to the IP address of the Windows XP environment machine followed by the html document name.

In the Windows XP case, I used localhost, as shown below:

By typing 192.168.1.34/runnerRunning.html on the iPod Touch, the page was displayed, as shown below:


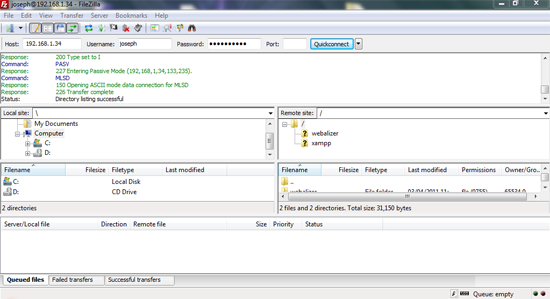
Next came the issue of the FTP. I set-up accounts using FileZilla for the guest to connect. On the Windows environment, when attempting to connect to the FTP from another machine, such as the Acer Laptop, no connection was being established. This was later identified as being simply the Windows firewall blocking FTP connections to the machine.

In fact, when I ran the FTP server from the Ubuntu environment, no problems occoured when connecting to it using the Acer Laptop, as shown in the next image:
The next image shows the guest connection to the FTP from the server side, on the Windows 7 environment.


Some errors encountered along the way were primarily seen in the Windows 7 environment. When trying to start or stop a service, it sometimes gave a "-1" error. This is probably attributed to some conflicting services running on this machine at the same time (ex: Skype, MySQL etc). On the clean Windows XP and Ubuntu environments, no such errors occoured.

Thursday, March 24, 2011

Web Accessibility

For this week, the lecture started off with a talk on accessibility by Ms Lucy Dodds. The talk was quite informative and contained elements of which I was never aware or have considered before. When we usually design a website we often worry most about the code and maybe the aesthetics of the page most. This often makes us neglect the fact that our page might not be as accessible as we may think.

Disabilities exists, we just have to open our eyes to notice them; from rare genetic diseases to a decline in senses through old age. They are normally classified into four main categories: intellectual, visual, auditory and motor.

When tackling the building of a website one must think about all of the types of users that are going to be visiting it. They might include people bearing one of the defined categorical disabilities. Each particular category requires a different approach to convey the intended information on your page.

Over the course of the past few days I have been more conscious to accessibility when browsing the web, both in terms of observing what others do and in terms of what I do.

I noted that several of the highly visited sites, especially news agencies take the issue relatively seriously. You will find each picture correctly labelled, simple and clean layouts, options to change the text size and well defined colour schemes. These are also apparent in some of the phone Apps found today. When it comes to my own material I am now paying attention to the html title and caption I give to a picture and also the choice of words I use.

In a nutshell, simple changes from the part of the developer/designer/publisher may work wonders for some people and be the difference between an enjoyable and repeated stay to an immediate search for another source.

Thursday, March 17, 2011

Coursework 1 - Running Man Animation

Overview

The runningMan animation, being a coursework for this module I decided to add some more features to it. I’m relatively new to the web world but despite that I still enjoyed the challenge that comes with novelty and diving into a huge and deep pool. Along the way, undoubtedly I will encounter frustration with cross-browser compatibility.


The Idea

What I intend to add is a form of “target” image that will move with the mouse pointer as a form of cross-hairs. The central animation; the runningMan is enclosed in a box (a div) that will be the area on which if the user clicked in it, a bomb will fire. A bomb image will travel from the location of the click to the runner’s head and upon arrival; the runningMan animation will simulate an explosion, by changing the animation.


Drawing the Target

The basic outline of this section was:

  • Draw the image
  • Get the mouse coordinates
  • Show the image at the coordinates

Draw the image - First off, I made the target image which is two circle outlines enclosed, one in the other.

Get the mouse coordinates - the first method I discovered to get the mouse coordinates was the “event.clientX” and “event.clientY”. This gets the user’s X,Y mouse position on the browser. I implemented the code and tried to test it with a simple alert. It worked. But when I loaded the same code in Firefox, nothing happened. IE and Chrome worked correctly. So I looked for a Firefox alternative and came across a universal method at http://forums.asp.net/p/1176241/1990722.aspx. It seems like the previous method formed part of the IE object model and was only relevant to it. The page continues to explain that there is no reliable cross-browser way of getting the coordinates, so a manual calculation has to be made using the scrolling and DOM measurements. I implemented the script found there and it worked successfully across all three browsers.

Show the image at the coordinates – the next step involved making use of the coordinates gathered and placing an image at that position. So I added the image to the HTML body and moved added lines to move the image to the mouse coordinates using the getElementById and referring to the CSS styles positioning. When testing it, I found that the image was not overlapping all the elements, and getting behind some of them. A quick search pointed me to the z-index CSS style that dictates which element overlaps which. Giving a z-index of 20 to the target image solved the issue. The next issue was that since the image is directly under the mouse, when clicking, one will click the target image. I wanted the image to be placed at the slightly offset of the pointer, so moved its position by 5 pixels each way. The resulting code is shown below.


Moving the bomb

The basic outline of this section was:

  • Find an image
  • Figure out how to identify the runningMan’s head
  • Store the position of the click
  • Generate array with X, Y coordinates for a straight line between the click and the runningMan’s head
  • Move the image according to the array of coordinates

Find an image – I found an image of a mine and resized it to appropriate proportions and added transparency to it.

Figure out how to identify the runningMan’s head – the first thing that came to mind was to always refer to a fixed position. But this is incorrect since the animation is held at the centre of the browser, and thus, its position will change if the browser is resized. After some experimentation I figured out that the Y-coordinate will always remain the same and that the runningMan’s head can be identified as always to be horizontally central. The code is shown below:

Storing the position of the click – this was simply done by getting the location of the mouse and storing it in a variable that will be used throughout the whole function.

Generate array with X, Y coordinates for a straight line between the click and the runningMan’s head – now comes the tricky bit. The target is essentially at the centre of the box so one can identify four quarters of movement. Simply changing the X or Y coordinates by 1 pixel each time until they reach the target will not make a straight line. It will be in most cases curved. The curve results from the fact that you have no guarantee that your X and Y coordinates are the same distance from the target. This required some math.

First, I decided to come up with the math myself. My approach was to identify the coordinate with the longest distance and make that distance the number of pixels I needed. Then I would fill that coordinate with all the pixels at 1-intervals while filling the other with a rounded number in ratio with the corresponding pixel. The attempt half succeed but after quite some time I realised I wasn’t going anywhere. The trial code can be seen in additionalCode.txt and is the function called firebomb.

Stuck and out of ideas, I decided to re-think my approach and recalled a friend having the same problem with drawing a straight line with pixels, defined by 2 points. He had made use of an existing algorithm. A few searches later, I found the Bresenham’s line algorithm. The illustration below perfectly illustrates the problem:

Besenham’s line algorithm general equation is shown below:

A few searches later I found some implementations of the algorithm in JavaScript. Some were plainly over-complicated until I came across a simple and clear implementation on: http://stackoverflow.com/questions/4672279/bresenham-algorithm-in-javascript I adapted it to my script and voila, the arrays were generated correctly. An example is shown below:

Move the image according to the array of coordinates – the basic concept was to move the image every time a new coordinate is created, within the function. Another concept was to move the image in a separate function by looping through the arrays of coordinates. Both ideas were tried and tested but to no avail. The image would either simply be shown at its end location, or at its start location for a brief time followed by the end location. After some reading on the matter, some sources reported the same problem. Some users said that the browser will sometimes simply decide to skip the loops in between, either because it cannot keep up or because it sees the animation as being in a very short period of time so it skips it. One of the issues that I came across was that you cannot place a timer within a loop, but rather, make it loop on itself.

I am not sure whether what I had in mind is possible to implement in JavaScript or I simply wasn’t doing it correctly. Probably, the latter. Given that I couldn’t get the animation correct, I decided to compromise by showing what I had already done, from the math perspective. So, I decided to output the coordinates of the path to be taken by the animation each time a user clicks to fire. I opted for an in-page output, using the innerHTML in a div, which can take a while to render (HTML wise) when the user clicks far away from the runningMan. I also tried outputting through a message box but it was annoying, having to close it every time and if the arrays are too long, they won’t fit in the box. The code for the HTML output is shown below:

(UPDATE) - Turns out, it was the latter. I have successfully implemented the animation after having one last go. I utilised the same routine as the original example demonstrated and modified it to this purpose. The final code is shown below:


Adding the exploding animation

  • The basic outline of this section was:
  • Draw the exploding animation
  • Write a function that will input the image names in the array through a loop
  • Write the function to display the animation
  • Trigger the function if the specific box is clicked

Draw the exploding animation – I drew a series of 49 images for the exploding animation, seen below:

Write a function that will input the image names in the array through a loop – instead of having to call each image by its name in a line-by-line coding manner, I wrote a function that will fill the array for my 49 images. While I was implementing this, I decided to implement the same thing for the fall and run arrays. The code for the filling the explode array is shown below:

Write the function to display the animation – The function to display the explode animation was done like the running and falling animations

Trigger the function if the specific box is clicked – to trigger the function when the box is clicked, I implemented an onClick value to the runningField div, referring to the showExplosion function. The code is shown below:


Conclusion

Overall, at the very last minute, I achieved what I first set out to do; with loads of bumps and hiccups on the way and a last minute update. JavaScipt and web in general is vast, and it was quite a steep learning curve to get to grips with the basis of it all. The whole page might require some polishing, but the basic functionality is there.


A gallery of the page working is displayed below:

Sunday, March 13, 2011

A look at XML, DTD/XSD, XSLT

Overview

XML is used all over the web. It is used as a means to transport data, best described by W3 schools as "a software and hardware independent tool for carrying information". The aim of XML is to simplify the interactions with the data and facilitate the transport of data across multiple platforms.

I have encountered XML previously while dealing with some databases and Web applications but have never actually started an XML file from scratch and neither had I ever created a DTD for my data but just made use of an existing one. I also continuously make use of specific XML created languages; particularly RSS feeds to keep myself updated on current events.

The basic structure of XML is not that complicated to understand. XML required a root element to be defined and all the other elements to be defined within it. Understanding attributes and how to properly define them was the next step followed by how to provide a structure for your XML, using a DTD.

Weekly Exercise

This week's exercise was as follows:

Create an XML file for to keep the following data about a student project: student name, student ID, project title, project category, abstract, date submitted. Try to use both elements and attributes to describe the data. Validate the XML using the W3Schools XML Validator. Create a DTD Schema for the XML file and validate the XML against the schema using the W3Schools DTD Validator.

I decided to start with the DTD instead of the XML as it seems to make more sense to start by defining the structure of your file first off, and then making use of it. I identified Student and Project as our main elements and the rest of the fields as their attributes.

The DTD created is as follows:

<?xml version="1.0" encoding="utf-8"?>
<!DOCTYPE studentProject [
<!ELEMENT studentProject (student, project)>
<!ELEMENT student (#PCDATA)>
<!ELEMENT project (#PCDATA)>

<!ATTLIST student name CDATA #REQUIRED>
<!ATTLIST student id CDATA #REQUIRED>
<!ATTLIST project title CDATA #REQUIRED>
<!ATTLIST project category CDATA #REQUIRED>
<!ATTLIST project abstract CDATA #REQUIRED>
<!ATTLIST project submitDate CDATA #REQUIRED>
]>

I added some sample data and tried to validate it against the W3 Schools validator but after some time we discovered that that same validator only worked on Internet Explorer. So I quickly searched for another one and found www.xmlvalidator.com.

Adding one studentProject gave no errors but when trying to add multiple projects was not possible using this DTD since the root element is studentProject itself. So I added another element called databaseSystem which incorporates a studentProject element. I thought this was it but still couldn't add multiple projects. After some research I discovered that one must add a "+" after an element that can be repeated. So the first few lines of the DTD were changed to:

<!DOCTYPE databaseSystem [
<!ELEMENT databaseSystem (studentProject+)>
<!ELEMENT studentProject (student, project)>

Adding more and more data gave no more errors in the XML Validator.

Thursday, March 10, 2011

JavaScript - Part 2

Overview

The third lecture in the Web Systems Development module focused on adding more JavaScript knowledge to that of the previous week. The lecture focused mainly on understanding the DOM (Document Object Model) and how to access the HTML elements. This was followed by multiple examples, namely the Running Man animation.

Through the lecture and accompanied by further reading, I was able to understand some of the commonly used DOM properties and methods and how they are used. Such as getting an HTML element with the specified id using "getElementByID()".

I did some furthur reading on Cookies, JQuery and String manipulation for better understanding. NewThinkTank has a slew of very useful video tutorial, which I used. http://www.newthinktank.com/

Weekly Exercise

This week, we were asked to implement the Running Man animation, and add functionality to slow down/ speed up the animation as well as be able to "throw" an obstacle at the runner. The core script of the basic running loop was featured on the slides.

First off, I decided to draw my own running man images, which I then implemented in the existing code. The code took some tweaking to get to work, mainly getting rid of stray double quotes and some missing semi-colons. Havin checked that the animation was running smoothly so far, I decided to implement the animation-speed manipulation to the page.

For the animation-speed, I first added two buttons, "Faster" and "Slower". Then, I added a variable that will hold the current timing as desired by the user. The provided code makes of the "setInterval()" method when definening the waiting-time for displaying the next image. Adding and subtracting the timing value straight to the "setInterval" method was not working. After some research, I learned that another timing method existed, the "setTimeout" method which can be implemented in the JavaScript, and one will simply change the timing value from the HTML, as shown in the images below:


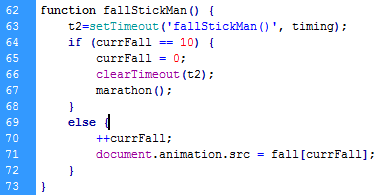
For the "throwning an object" section I decided to change the animation when a button is clicked. I first drew a series of images showing the stick-man falling into a hole and resurrecting. Then I implemented them into my JavaScript and added a second function which will display the "falling" series of images and continue the "running" images afterwards. I decided to add a seperate timer to this function and also made sure to clear both timers when the "Stop" button is pressed. The added function is shown below:


The user is now able to change the animation at the click of a button. I also added some CSS Styling to the whole page and the buttons as a visual enhancement and tested the page on Google Chrome, IE8 and Firefox.


Thursday, March 3, 2011

JavaScript - Part 1

JavaScript Overview


First off, JavaScript has absolutely nothing to do with Java apart from the fact that they share similar names. JavaScript is a scripting language used on the web. It can be said that currently, it is by far the most used web-scripting tool. This level of success was partly because it is supported by the leading browsers of the moment. It waves goodbye to static, functionless pages and introduces us to dynamic content.


Scripting, such as JavaScript, adds functionality and interactivity to your web pages. JavaScript can be either directly implemented into your HTML pages or as a seperate file which could be referred to when necessary. One should also note that JavaScript is license-free.


JavaScript provides HTML designers with a programming tool write in their HTML page. This enables them to perform actions such as validate data on the clients' side and reduce server-side processing. JavaScipt is also event-driven, which implies that it can perform functions when an event has occoured (ex: mouse click). Since JavaScript goes hand-in-hand with HTML it can put dynamic text into an HTML page, such as adding a variable. It can also call HTML elements and amend them.


Hands-On


Making use once again of W3Schools, which provide great explainations accompanied by suitable examples, I started to get the feel of JavaScript. The first steps consisted of:


  • Understanding its' place in an HTML document (in the <script type="text/javascript"></script> tags)

  • How to change HTML elements through JavaScript

  • Calling JavaScript functions from the HTML

  • The differences on were to place your JavaScript. Typically all the script is one block and in the <head> tag.

  • How to call external JavaScipt files


Coming from a Java background I understand the implication that JavaScript is case sensitive. While reading through and experimenting with the examples on W3Schools pages it became immediately apprent that the JavaScript syntax is pretty similar to Java's, which I am quite familiar with.


Assigned Example


We were assigned the task of modifying an existing HTML file with some of our custom ideas and some assigned ones.


The document can be found at

http://www.davidflanagan.com/javascript5/display.php?n=1-3&f=01/03.html


In brief, we were required to:


  • Properly understand what the code does

  • Modify its' CSS and HTML to make it more presentable

  • Add these functions

    • Total number of payments

    • Date when loan ends


  • Add a checkbox which reduces the interest rate by 10%

  • Add a feature of your own


To properly understnad the code once has to first understand which parts are in HTML, which CSS and which are JavaScript. Reading through the code I was able to gain some understanding as to what is what and what does what. I modified the CSS to include a picture as a background and placed the table to be always at the centre of the browser.


I then added space in the tables for the new functions needed and started to amend the JavaScript to include the required functionality.


To be continued...

Thursday, February 24, 2011

Understanding CSS & HTML

Module Introduction

The first lecture kicked off with a typical overview of the module. This was followed by the idea that we need to create a blog with weekly entries that highlight our knowledge and understanding for the week. I really think that this is a good model for learning as it helps us to better understand the concepts learned by being able to explain them in a publishable manner. The module, as first impressions go, seems to be far more interesting than the title may seem to lead.

The coming into being of CSS & its' syntax

When the internet began to grow in popularity and web-developers started to realise that a little effort in the webpage design wouldn't hurt, the need for better formatting tools arose. At first, the ability of writing formatting in the HTML code seemed to be the solution. Soon, it became apparent that this could lead to much complications and confusion. Therefore, CSS (Cascading Style Sheets) was born. A tool for describing how to display HTML elements and thus creating a separation between the actual content and its' formatting. The separation could also take the form of two separate files. .html for the content and .css for the formatting.

Through http://www.w3schools.com/css I was able to get a grasp and understand the CSS syntax with the aid of its' practical examples. The basics were quite straight-forward. Having many lines of CSS code was a bit confusing at first but after some time it got more and more familiar.

Tackling a practical example

For a practical example, I visited www.csszengarden.com and download the sample HTML and CSS file. I opened both in Dreamweaver and started tinkering with the CSS code. I set a rough idea of the changes I wanted to make to this design.

It consisted of:
  • Moving the "Summary" section to the right
  • Moving the "Select a Design" section to the left and widening it
  • Re-arrange the first two headings
  • Change the background to something different

First I took a look at the actual webpage and trying to understand its' design. For this, the Google Chrome "Inspect Element" feature proved to be extremely useful. It allows you to select an element and view all its' relative CSS and HTML code.

Back in Dreamweaver, I experimented with the elements by temporarily removing some of them to view the effect on the whole webpage. The whole structure of an element within an element, to define the appropriate design used in CSS, soon became apparent.

Then I set about constructing my own design. Paddings and margins became a headache at first, but after some re-thinking I got the "Summary" and "Select a Design" sections were and how I wanted. The "float" attribute for an element was quite useful since it allows elements to wrap around each other. This is essential since users tend to have different screen resolutions/sizes.

Diversity is the biggest headache for webpage designing; trying to get the same webpage to be displayed in the same manner in all the browsers. This became blatantly apparent when consulting CSS websites. One such example was that I wanted a round-cornered box around my "Summary" section. A quick search led me to the "border-radius" tag which was recently introduced in CSS3. When I implemented this and tested it, Chrome displayed a rounded box while Firefox and Internet Explorer didn't.

To complete my design changed the first two headings and included two fairly large backgrounds that will change the mood and feel of the page; displayed at the top and bottom of it.

Some sample code used:

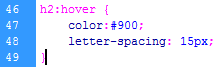
The code below changes the color to red and widens the letter spacing for when the mouse is hovered on Heading 2

The code below adds a bottom image, puts some spacing for it and repeats it horizontally


The final design and adjustments are displayed in the image below. That's all for this week.