Second Life is an online 3D game providing access to virual worlds. A player can create their own fully customisable avatar which is able to interact with the worlds. A player can also create their own objects using the in-built 3D modelling tool, which they may share with others.
Second Life's hierarchical system of objects is as follows:
Main Grid - The main area holding everything
Regions - residing in the Main Grid. A region pertains to a specific server and is made up of multiple prims
Prims - objects in-game are made up of prims (primitive types - geometrical shapes)
For these next few weeks, we'll be tasked to delve deeper into Second Life and understand and create our own objects as an end-goal.
The Basics
Downloading the client and creating an account was a breeze but upon logging in for the first time, the first immediate reaction was the amount of lag you experience. The objects were taking ages to load, so I headed over the the Preferences and reduced the quality to Low and increased the "Drawing Distance" slightly for the default Low value. Doing so resulted in good gameplay over better graphics and bandwidth usage.
The controls are very easy to understand, being quite similar to a typical 3rd person game. The addition of being able to fly always everywhere was also quite welcome. I started by changing my avatar's physical appearance.
After changing the appearance, I started to get more familiar with all the game's interfaces. How to handle objects, add friends, make landmarks, switch worlds and such.
Exploring
Being quite into planes and any type of vehicle myself, I decided to find out if I can drive one. After some searching and a few pointers from fellow players I learned that you can own a plane/vehicle by buying it for the Linden in-game money. The vehicles are advanced prims built by other players. When you buy one, you can keep it in your inventory and "use" it when you like. I also found that there are areas which let you test these vehicles, so I went to specific world as advised by another player.
The in-game objects that lets you create a temporary new plane, gives you an object which need to wear. This object is the controls for the plane and needs to be unequipped after each flight.
I also explored many world at random and found some pretty neat concepts such as: Central Dublin, multiple castles, paradise islands and even space/stellar worlds.
Conclusion
All in all, the game is quite enjoyable with a great concept but somewhat lacking in execution. The lag, unexpected crashes and multitude of buggy features tend to overshadow the game. In combating the latency issues I ran the game on both Windows 7 and the latest distribution of Ubuntu. On Windows 7, the game was quite stable but a bit laggy, while on Ubuntu, the viewer crashed every time I switched a world but on the other hand was less laggy (using same settings). I still have to get round to building objects, which I think will be even more interesting.
Coursework 2 is a culmination of previous tasks, rolled into one. It takes what was previously learned in the PHP lectures and packs them in a task that aims at the integration of our PHP scripts in forming a suitable web-program.
Overview
Coursework 2, was as follows:
Write a remote Web space management system suitable for handling Web site content of various types. It should allow a user to add and organise files to a personal Web area which is secured by password. Again, there will be a connected theme, to be announced in lecture time.
This program should include the following features.
(1) Your program should be written as PHP scripts. The user should be able to work with this program via a Web browser from any computer connected to the Internet.
(2) When your program starts, it should ask the user to enter a password and username, and not allow the user to access their Web space unless they know the password. Passwords should be stored in an appropriate MySQL database.
(3) Once allowed access the user should be able to:
(a) Make and delete directories
(b) Delete files
(c) Upload new files
(d) Only be able to access their own space, which should have space limits imposed upon it.
User data and passwords should be stored in an appropriate MySQL database or file system which the PHP script can access; you must consider security implications. There are no restrictions on the style of the user interface, although you should consider ease of use and design to be issues too.
Beyond the basic file management capabilities you could also consider adding the following:
User preferences which alter the interface depending on who logs in.
Auto-update of files so when a Website has been updated locally all new files can be uploaded.
Support for mobile device (‘phone or PDA etc.)
Storing Files: File System vs. Database
When it comes to storing files I came across the old debate of whether to store your files on the server file system or directly in your database. I found good and valid arguments for either solution, which I have presented below:
File System Pros
Scenario for storing files on your file system and their location in a database
The ability to serve the files as static
No database coding is required to access the files
The files could be stored on a separate location to optimise performance
Reduce bottlenecks in your database
A database is at the end of the day, still on your file system
Easy caching
File System Cons
Files are easily in view in your file system
File have no real relations between them
Extra scripts need to be made to maintain integrity between the files and their locations on the database
Permissions to store files on your file system is needed
Easy association between the files and their owners/properties
Features like auto-sorting can be easily implemented
Data is stored in a single location, making it easier to backup or move to another server
No easy access to files through simply file system browsing
General notion is that the database is generally slower performance-wise
Lack of easy access to files
To backup your files, all the database needs to be copied
Database Pros
Easy association between the files and their owners/properties
Features like auto-sorting can be easily implemented
Data is stored in a single location, making it easier to backup or move to another server
No easy access to files through simply file system browsing
General notion is that the database is generally slower performance-wise
Lack of easy access to files
To backup your files, all the database needs to be copied
Database Cons
General notion is that the database is generally slower performance-wise
Lack of easy access to files
To backup your files, all the database needs to be copied
Decision
While looking into the matter, I also chanced upon a paper which researched and compared the idea that: files smaller than 256kb are faster to store in a Database and files larger than 1Mb are faster on a file system. The research analysed the performance with different file sizes and found the notion to be generally true, albeit less significant difference at the lower end. In general, large amounts of data to be transferred and stored, mostly above 1Mb are better stored in the file system, favouring performance.
For the purpose of the simple web-space I opted for a database solution and limiting the users’ maximum file size to 1Mb. Have a 1Mb limit is a fair assumption, since most documents and images are never larger than that. This will store my files in a central location and make them less susceptible to easy attacks, such as file system browsing. On the other hand, I am aware that they are now more subject to direct SQL attacks.
A description of my working environment while developing this web-program
Developing on Windows 7 machine using Eclipse with PHP plug-in
Running Ubuntu 10.10 on a VMWare Virtual Machine
Xampp for Linux (lampp) installed on Ubuntu
Assigned a separate IP address for Ubuntu VM in my home network
Accessed pages from Windows 7 to simulate client accessing server (different IPs)
Testing browsers: Google Chrome 11, Mozilla Firefox 4, Microsoft Internet Explorer 9
MySQL Tables
The first stepping stone for this coursework was to create the tables needed in our servers’ MySQL database. I identified that two tables were required: a user table and a file table
User table
User ID
User Name
User Password
Creation Date
File table
File ID
File user name
Name of file
Type of file (MIME info)
Size of file
Content
These tables were created on the servers’ MySQL database
Register
The basic structure of the PHP code when a user attempts to register is shown below:
Check for any black fields
Check that both passwords given match
Connect to database
Check if the username is already in use
Add slashes to the password (reduce SQL injection attacks)
Encrypt password
Insert the data into the database
Return message to show completion
Redirect to Log In page
The PHP code is shown below:
followed by a screenshot of the register form
Log In
The code for the Log In page, is structured as so:
Check that the user has actually filled the form
Check if username exists
Connect to database
Get password for that username
Stripslashes of entered password
Encrypt entered password
Match encrypted passwords
Create Session if all successful and redirect to phpMainPage.php
The PHP code is shown below:
followed by a screenshot of the Log In window
Sessions
To prevent users from simply entering the URL of a PHP page and accessing it, a method for authenticating the user is required: hence PHP Sessions. A PHP session allows us to save information for later use on the server. Thus, it also enables information to pass from one PHP page to another.
For this task I intend to use the Session to:
Store the username and therefore by checking that it exists in each page, we can now verify if the user is indeed, a registered user, and is authenticated to visit that page or perform that action
Store notification messages, such as “Deleted file info.png”
Store the size percentage still available to the user
The PHP code that precedes every page to authenticate the user is shown below:
Uploading Files
Before deciding on how to upload a file, some rules had to be made. It was decided that each user will have a space of 50mb each. Also, each file that is uploaded must not exceed 1Mb in size. When looking at the types of files to be allowed, I decided to allow:
.pdf – Adobe PDF
.doc, .docx – Old and new Word Document format
.xls, .xlsx – Old and new Excel Document format
.ppt, .pptx – Old and new Powerpoint Presentation format
.jpeg, .png, .gif – Image types
The proceedings of uploading a file are outlined below:
Check the remaining space available
Get the name, type (MIME) and size of the posted file
Check that the size of the file does not exceed 1Mb
Check that the type of file is of an acceptable format
Check the server for magic quotes
Addslashes
Open file
Read file
Apply addslashes
Close file
Connect to the database
Write query that will insert the name, type, size and content of the file into the database
Execute query
Close the sql connection
Notify the user
Actual PHP script for uploading a file:
followed by a screenshot of a user uploading a file and receiving an appropriate confirmation message
Deleting Files
Deleting a file is fairly similar to the other procedures:
Connect to database
Form the query according to the file chose for that particular user
Execute query
Close connection
Notify the user via the session
Redirect back to the main page
Script for deleting a file:
followed by a visual confirmation of a user deleting a file, in this case, an image
Downloading Files
When I got to the part of writing the script to download the file from the database, it proved to be quite problematic. The first part of the process was the same as the deletion of files, but I couldn’t quite get the “serving the file to the user” part quite right at first. After quite a bit of research and digging, with many false positives I found a working solution.
The process is similar to the deletion of files, with the exception that the file sent to the user through the use of “header("Content-Disposition: attachment; filename=$name");”. The size and type of the file are also passed to the header to instruct the browser on what to do with the passed file.
Script for downloading the file:
followed by a screenshot of a downloaded file in Google Chrome
Webspace Size Limit
The function for checking and limiting the amount of user uploads was stored in a separate PHP page. Giving the amount left in percentage seems like a good idea to further guide the user.
Connect to database
Write query to get the size of all the files of user given
Execute query
Put each row of size into an array
Add all the values of the array and calculate percentage from 50Mb
Add the result to the session
PHP script for the space remaining check:
Main Page
The main page is intended to be the “central control panel” for the user, were they can upload/delete and download their files while getting the appropriate information such as notifications and current space remaining all at a glance. This undoubtedly is designed with user usability in mind.
The basic concept includes:
Displaying the name of the user logged in
Adding a Log Out button
A notification area (to display a message when a file is appended)
A button to select a file for upload, and one to upload it
A percentage metre of the space available
A list of all the files the user has, each having a download and a delete option
Getting the filename list was quite straight-forward; done with an SQL query and the list of files stored in an array. Being quite new to PHP, I encountered a problem with the idea of generating a table for each filename, adding a delete and download button, and having the buttons trigger the action.
Generating the table was not the issue and it was done by looping through the filenames and issuing html code for each filename. The problem came when I tried to trigger the PHP script by writing a redirection in the “onclick” property of the button. It seemed logical to do so, but in fact I was totally wrong, since PHP is a server-side script and you cannot simply call a page from within the HTML.
PHP typically functions by packaging your information into a form and sending it to the server. Building on this, I transformed my table for containing the filenames and buttons into a form. Having done so, I stumbled upon another hurdle. I was looping through the form generation and assigning a hidden value having name be an “echo” of the “filename[i]” from the loop. When the button is actually called, “i” actually contains the number for the last entry of the array. Therefore, effectively, the name of the last file was always being sent.
After a fair amount of reading I stumbled upon a similar issue posed by a fellow learner of PHP. The proposed solution was to actually add the “filename[i]” as an associative array in the name property. This was successful and I got rid of the hidden value and added a “Download[filename[i]” idea to the name property of each button.
When I attempt to now download and delete a file by clicking their respective buttons, the action and its’ filename are posted to phpEditFile.php were they are analysed and directed to the respective functions.
The PHP script for the Main page is shown below:
followed by a screenshot giving an overview of the Main Page
Future Improvements
Labels
Trash
Colour Scheme
Date Uploaded
Given the certain time constrains, and the task being an academic project, there were some functions that I wanted to add but couldn’t. First off an option to place a label for a file would have made the experience more Gmail-like and intuitive. Another feature I wanted to add was a hint of user customisation were the user can select a colour scheme for their Main Page, and the colour scheme being used every time the user logs in.
At the beginning I overlooked the need to save the date of when a file was uploaded. This would have allowed a sort by date option. Apart from these, with some more time and some JavaScript the web-program can become much more appeasing to the eye. It serves it function but somewhat lacks in eye-candy.
One more future improvement would be to eliminate the page refreshing. After some research I learned that in order to do this, one must make use of AJAX. It is now on the future, to-do list.
Conclusion and Reflection
Upon further consideration, the decision to store the files as in the database rather than directly to the file system might not have been such a great idea, weighing the respective advantages and disadvantages. For a simple, limited solution, the database option is a safe bet, but if you intend to scale out in a real environment, the file system option is much more suitable. If I had to start the task again, I would probably go for a file system approach. The database approach was an early decision in this task, which reciprocated throughout the whole task.
All in all, the task was a good learning exercise. Applying the various concepts picked up during the lectures and joining them together into one task, accompanied by independent research to resolve particular problems, was a good thing. A steep learning curve with any new concepts ensued, which undoubtedly took its’ toll at some times, but the end result was good.
For this week, client-side scripting took the back-seat to make way for server-side scripting. But first, before diving head-on into PHP, an introduction to server-side thinking was due.
One important step was understanding the Dynamic Web Model. This model defines how typical webpage is handled. In basic terms:
A user makes a request
Server-side language running on server (ex. Perl) recieves it
Adjusts reply according to the user input
Sends it back in HTML format
This was followed by a look at web-servers and our choice of tools for learning purposes, namely XAMPP.
The Task - XAMPP Configuration
An overview of the task is shown below:
Install XAMPP on your computer
Test the following functions
Control panel
Check that the http and https services work
Ftp service
Get an XAMPP security report
Get a phpinfo report
Get a visitor report
Test the default guestbook
Add an image and a style sheet to C:\xampp\htdocs\index.html and test it out
Test your web server from another computer
Attempt to replace index.html and other files using an FTP client on another computer
Before continueing with the configuration, the diagram below is intended to illustrate my environment for this configuration
The first step was to download and install XAMPP. I decided to install all it's services; namely, Apache, MySQL and FileZilla on all the environments. When running the setup, on the Windows 7 environment a warning popped up regarding some features not being available and checking your User Account Control. This was solved by probing in the Windows settings right after the installation to turn the required services on and make firewall exceptions for them.
On the Windows 7 environment, I had a previous installation of MySQL, with it's services running which resulted in an "error in port 3306 MySQL connection". Simply stopping and restarting the respective services solved the issue.
The image below shows the installation of XAMPP on the Windows 7 environment
The image below shows the XAMPP control panel running in the Windows 7 environment. Notice that MySQL had been stopped as I was still trying to resolve the conflicting issues between it and XAMPP
The Windows XP installation provided no issues since it was run on a clean Virtual Machine installation.
Turning to the Ubuntu installation, the image below illustrates the intallation of XAMPP
The following image demonstrates the starting of XAMPP server in Ubuntu
The next image checks that XAMPP is runing properly in Ubuntu
Moving through the Control Panel, I now checked what seperate services were running. Using "localhost", you are able to refer to the same machine and the status-running window is displayed in the browser. Through the controls, the next image shows the status of the HTTPS and FTP services (running) in the Windows XP environment.
Next, I took a look at the security report. The Windows 7 XAMPP security report is shown below:
One can also view the PHP info running on the server, as shown in the image below:
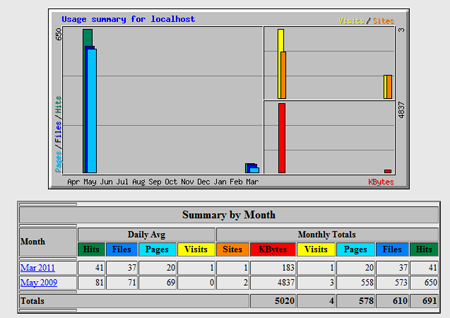
XAMPP also provides a simple visitor report, which is shown below:
A guestbook is also provided, as demonstrated below:
To further check the runnings of the server I put the runningMan animation, which is a previous assignment, into the htdocs folder of the Windows XP environment XAMPP setup. I checked if it was running through all machines on the network by refering to the IP address of the Windows XP environment machine followed by the html document name.
In the Windows XP case, I used localhost, as shown below:
By typing 192.168.1.34/runnerRunning.html on the iPod Touch, the page was displayed, as shown below:
Next came the issue of the FTP. I set-up accounts using FileZilla for the guest to connect. On the Windows environment, when attempting to connect to the FTP from another machine, such as the Acer Laptop, no connection was being established. This was later identified as being simply the Windows firewall blocking FTP connections to the machine.
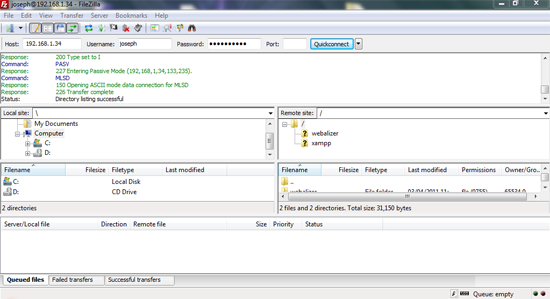
In fact, when I ran the FTP server from the Ubuntu environment, no problems occoured when connecting to it using the Acer Laptop, as shown in the next image:
The next image shows the guest connection to the FTP from the server side, on the Windows 7 environment.
Some errors encountered along the way were primarily seen in the Windows 7 environment. When trying to start or stop a service, it sometimes gave a "-1" error. This is probably attributed to some conflicting services running on this machine at the same time (ex: Skype, MySQL etc). On the clean Windows XP and Ubuntu environments, no such errors occoured.
For this week, the lecture started off with a talk on accessibility by Ms Lucy Dodds. The talk was quite informative and contained elements of which I was never aware or have considered before. When we usually design a website we often worry most about the code and maybe the aesthetics of the page most. This often makes us neglect the fact that our page might not be as accessible as we may think.
Disabilities exists, we just have to open our eyes to notice them; from rare genetic diseases to a decline in senses through old age. They are normally classified into four main categories: intellectual, visual, auditory and motor.
When tackling the building of a website one must think about all of the types of users that are going to be visiting it. They might include people bearing one of the defined categorical disabilities. Each particular category requires a different approach to convey the intended information on your page.
Over the course of the past few days I have been more conscious to accessibility when browsing the web, both in terms of observing what others do and in terms of what I do.
I noted that several of the highly visited sites, especially news agencies take the issue relatively seriously. You will find each picture correctly labelled, simple and clean layouts, options to change the text size and well defined colour schemes. These are also apparent in some of the phone Apps found today. When it comes to my own material I am now paying attention to the html title and caption I give to a picture and also the choice of words I use.
In a nutshell, simple changes from the part of the developer/designer/publisher may work wonders for some people and be the difference between an enjoyable and repeated stay to an immediate search for another source.
The runningMan animation, being a coursework for this module I decided to add some more features to it. I’m relatively new to the web world but despite that I still enjoyed the challenge that comes with novelty and diving into a huge and deep pool. Along the way, undoubtedly I will encounter frustration with cross-browser compatibility.
The Idea
What I intend to add is a form of “target” image that will move with the mouse pointer as a form of cross-hairs. The central animation; the runningMan is enclosed in a box (a div) that will be the area on which if the user clicked in it, a bomb will fire. A bomb image will travel from the location of the click to the runner’s head and upon arrival; the runningMan animation will simulate an explosion, by changing the animation.
Drawing the Target
The basic outline of this section was:
Draw the image
Get the mouse coordinates
Show the image at the coordinates
Draw the image - First off, I made the target image which is two circle outlines enclosed, one in the other.
Get the mouse coordinates - the first method I discovered to get the mouse coordinates was the “event.clientX” and “event.clientY”. This gets the user’s X,Y mouse position on the browser. I implemented the code and tried to test it with a simple alert. It worked. But when I loaded the same code in Firefox, nothing happened. IE and Chrome worked correctly. So I looked for a Firefox alternative and came across a universal method at http://forums.asp.net/p/1176241/1990722.aspx. It seems like the previous method formed part of the IE object model and was only relevant to it. The page continues to explain that there is no reliable cross-browser way of getting the coordinates, so a manual calculation has to be made using the scrolling and DOM measurements. I implemented the script found there and it worked successfully across all three browsers.
Show the image at the coordinates – the next step involved making use of the coordinates gathered and placing an image at that position. So I added the image to the HTML body and moved added lines to move the image to the mouse coordinates using the getElementById and referring to the CSS styles positioning. When testing it, I found that the image was not overlapping all the elements, and getting behind some of them. A quick search pointed me to the z-index CSS style that dictates which element overlaps which. Giving a z-index of 20 to the target image solved the issue. The next issue was that since the image is directly under the mouse, when clicking, one will click the target image. I wanted the image to be placed at the slightly offset of the pointer, so moved its position by 5 pixels each way. The resulting code is shown below.
Moving the bomb
The basic outline of this section was:
Find an image
Figure out how to identify the runningMan’s head
Store the position of the click
Generate array with X, Y coordinates for a straight line between the click and the runningMan’s head
Move the image according to the array of coordinates
Find an image – I found an image of a mine and resized it to appropriate proportions and added transparency to it.
Figure out how to identify the runningMan’s head – the first thing that came to mind was to always refer to a fixed position. But this is incorrect since the animation is held at the centre of the browser, and thus, its position will change if the browser is resized. After some experimentation I figured out that the Y-coordinate will always remain the same and that the runningMan’s head can be identified as always to be horizontally central. The code is shown below:
Storing the position of the click – this was simply done by getting the location of the mouse and storing it in a variable that will be used throughout the whole function.
Generate array with X, Y coordinates for a straight line between the click and the runningMan’s head – now comes the tricky bit. The target is essentially at the centre of the box so one can identify four quarters of movement. Simply changing the X or Y coordinates by 1 pixel each time until they reach the target will not make a straight line. It will be in most cases curved. The curve results from the fact that you have no guarantee that your X and Y coordinates are the same distance from the target. This required some math.
First, I decided to come up with the math myself. My approach was to identify the coordinate with the longest distance and make that distance the number of pixels I needed. Then I would fill that coordinate with all the pixels at 1-intervals while filling the other with a rounded number in ratio with the corresponding pixel. The attempt half succeed but after quite some time I realised I wasn’t going anywhere. The trial code can be seen in additionalCode.txt and is the function called firebomb.
Stuck and out of ideas, I decided to re-think my approach and recalled a friend having the same problem with drawing a straight line with pixels, defined by 2 points. He had made use of an existing algorithm. A few searches later, I found the Bresenham’s line algorithm. The illustration below perfectly illustrates the problem:
Besenham’s line algorithm general equation is shown below:
A few searches later I found some implementations of the algorithm in JavaScript. Some were plainly over-complicated until I came across a simple and clear implementation on: http://stackoverflow.com/questions/4672279/bresenham-algorithm-in-javascript I adapted it to my script and voila, the arrays were generated correctly. An example is shown below:
Move the image according to the array of coordinates – the basic concept was to move the image every time a new coordinate is created, within the function. Another concept was to move the image in a separate function by looping through the arrays of coordinates. Both ideas were tried and tested but to no avail. The image would either simply be shown at its end location, or at its start location for a brief time followed by the end location. After some reading on the matter, some sources reported the same problem. Some users said that the browser will sometimes simply decide to skip the loops in between, either because it cannot keep up or because it sees the animation as being in a very short period of time so it skips it. One of the issues that I came across was that you cannot place a timer within a loop, but rather, make it loop on itself.
I am not sure whether what I had in mind is possible to implement in JavaScript or I simply wasn’t doing it correctly. Probably, the latter. Given that I couldn’t get the animation correct, I decided to compromise by showing what I had already done, from the math perspective. So, I decided to output the coordinates of the path to be taken by the animation each time a user clicks to fire. I opted for an in-page output, using the innerHTML in a div, which can take a while to render (HTML wise) when the user clicks far away from the runningMan. I also tried outputting through a message box but it was annoying, having to close it every time and if the arrays are too long, they won’t fit in the box. The code for the HTML output is shown below:
(UPDATE) - Turns out, it was the latter. I have successfully implemented the animation after having one last go. I utilised the same routine as the original example demonstrated and modified it to this purpose. The final code is shown below:
Adding the exploding animation
The basic outline of this section was:
Draw the exploding animation
Write a function that will input the image names in the array through a loop
Write the function to display the animation
Trigger the function if the specific box is clicked
Draw the exploding animation – I drew a series of 49 images for the exploding animation, seen below:
Write a function that will input the image names in the array through a loop – instead of having to call each image by its name in a line-by-line coding manner, I wrote a function that will fill the array for my 49 images. While I was implementing this, I decided to implement the same thing for the fall and run arrays. The code for the filling the explode array is shown below:
Write the function to display the animation – The function to display the explode animation was done like the running and falling animations
Trigger the function if the specific box is clicked – to trigger the function when the box is clicked, I implemented an onClick value to the runningField div, referring to the showExplosion function. The code is shown below:
Conclusion
Overall, at the very last minute, I achieved what I first set out to do; with loads of bumps and hiccups on the way and a last minute update. JavaScipt and web in general is vast, and it was quite a steep learning curve to get to grips with the basis of it all. The whole page might require some polishing, but the basic functionality is there.
XML is used all over the web. It is used as a means to transport data, best described by W3 schools as "a software and hardware independent tool for carrying information". The aim of XML is to simplify the interactions with the data and facilitate the transport of data across multiple platforms.
I have encountered XML previously while dealing with some databases and Web applications but have never actually started an XML file from scratch and neither had I ever created a DTD for my data but just made use of an existing one. I also continuously make use of specific XML created languages; particularly RSS feeds to keep myself updated on current events.
The basic structure of XML is not that complicated to understand. XML required a root element to be defined and all the other elements to be defined within it. Understanding attributes and how to properly define them was the next step followed by how to provide a structure for your XML, using a DTD.
Weekly Exercise
This week's exercise was as follows:
Create an XML file for to keep the following data about a student project: student name, student ID, project title, project category, abstract, date submitted. Try to use both elements and attributes to describe the data. Validate the XML using the W3Schools XML Validator. Create a DTD Schema for the XML file and validate the XML against the schema using the W3Schools DTD Validator.
I decided to start with the DTD instead of the XML as it seems to make more sense to start by defining the structure of your file first off, and then making use of it. I identified Student and Project as our main elements and the rest of the fields as their attributes.
I added some sample data and tried to validate it against the W3 Schools validator but after some time we discovered that that same validator only worked on Internet Explorer. So I quickly searched for another one and found www.xmlvalidator.com.
Adding one studentProject gave no errors but when trying to add multiple projects was not possible using this DTD since the root element is studentProject itself. So I added another element called databaseSystem which incorporates a studentProject element. I thought this was it but still couldn't add multiple projects. After some research I discovered that one must add a "+" after an element that can be repeated. So the first few lines of the DTD were changed to:
The third lecture in the Web Systems Development module focused on adding more JavaScript knowledge to that of the previous week. The lecture focused mainly on understanding the DOM (Document Object Model) and how to access the HTML elements. This was followed by multiple examples, namely the Running Man animation.
Through the lecture and accompanied by further reading, I was able to understand some of the commonly used DOM properties and methods and how they are used. Such as getting an HTML element with the specified id using "getElementByID()".
I did some furthur reading on Cookies, JQuery and String manipulation for better understanding. NewThinkTank has a slew of very useful video tutorial, which I used. http://www.newthinktank.com/
Weekly Exercise
This week, we were asked to implement the Running Man animation, and add functionality to slow down/ speed up the animation as well as be able to "throw" an obstacle at the runner. The core script of the basic running loop was featured on the slides.
First off, I decided to draw my own running man images, which I then implemented in the existing code. The code took some tweaking to get to work, mainly getting rid of stray double quotes and some missing semi-colons. Havin checked that the animation was running smoothly so far, I decided to implement the animation-speed manipulation to the page.
For the animation-speed, I first added two buttons, "Faster" and "Slower". Then, I added a variable that will hold the current timing as desired by the user. The provided code makes of the "setInterval()" method when definening the waiting-time for displaying the next image. Adding and subtracting the timing value straight to the "setInterval" method was not working. After some research, I learned that another timing method existed, the "setTimeout" method which can be implemented in the JavaScript, and one will simply change the timing value from the HTML, as shown in the images below:
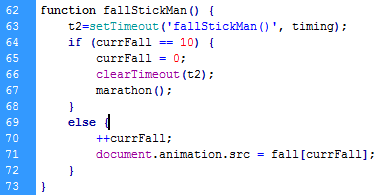
For the "throwning an object" section I decided to change the animation when a button is clicked. I first drew a series of images showing the stick-man falling into a hole and resurrecting. Then I implemented them into my JavaScript and added a second function which will display the "falling" series of images and continue the "running" images afterwards. I decided to add a seperate timer to this function and also made sure to clear both timers when the "Stop" button is pressed. The added function is shown below:
The user is now able to change the animation at the click of a button. I also added some CSS Styling to the whole page and the buttons as a visual enhancement and tested the page on Google Chrome, IE8 and Firefox.